Prisoners for Peace and CO Database manual
The War Resisters' International website includes a database of Prisoners for Peace and conscientious objectors, which can be accessed via 1. This database includes data on prisoners for peace and conscientious objectors, and is linked to co-alerts and the rest of the WRI website.
The data is split into public data, which can be viewed by everyone who views the WRI website, and private data, which is access restricted and can only be viewed by people with the right access rights.
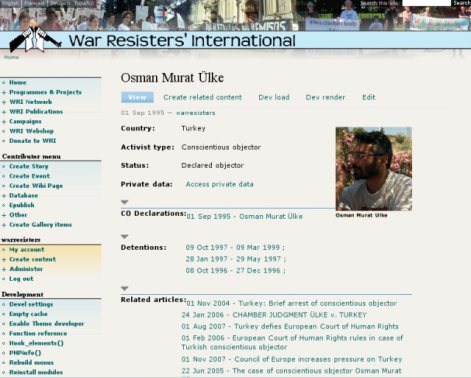
The Activist/CO public data
The public data consists of:
- the name of the activist or conscientious objector as the title (Osman Murat Ülke)
- the country of origin or residence (Turkey)
- the status (Declared objector)
- a link to the private data, which is access restricted. This link will only appear if you have the right to view the private data.
- links to CO declarations, if they exist. There can be more than one CO declarations for any one conscientious objector (1 Sep 1995 - Osman Murat Ülke)
- links to periods of detentions, if they exist (in the example three)
- links to CO alerts that have been issued by War Resisters' International in relation to the CO
- links to support emails in relation to this CO
- links to articles on the WRI website related to this conscientious objector
All links allow easy access to the relevant data.
Creating a new activist/conscientious objector
The Contributor menu on the left (only visible after login) is the place where you need to go to create a new activist or conscientious objector. The entry database might be 'collapsed', in which case you need to click on it or on the + in front of it to see all menu entries.
This menu also allows to create other content related to the database.
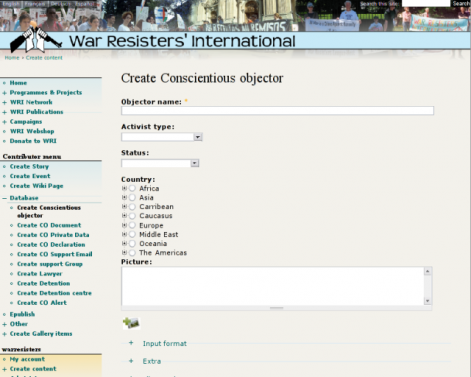
To create a new activist or conscientious objector, you use the menu item Create conscientious objector. A form will open which allows you to enter the relevant data.
The objector name should be written with all language specific special characters or umlauts. However, Latin script should be used here.
Under activist type it is possible to select from:
- Conscientious objector
- Total objector
- Tax resister
- Nonviolent activist
- Human rights defender
Choose the options which fits best. In countries where the right to conscientious objection is not recognised, conscientious objector should be chosen for all objectors, no matter what their position on a substitute service may be.
The status allows for the following input:
- Recruited
- Deserted
- Declared objector
- Pre-trial detention
- Serving sentence
- Unknown/disappeared
Again, choose the option that fits best.
It is extremely important not to forget to choose the country. To do so, click on the small arrow in front of the continent/region to expand the listing, and choose a country. If the activist or conscientious objector is from a non-recognised entity, choose the state it belongs to according to international law (i.e. choose Azerbaijan for Nagorno-Karabakh).
To add a photo of the conscientious objector or activist, click on the small symbol with the plus and an image. This will start Image Assist, which guides you through adding an image to any type of content on the WRI website.
Once you are done, you click Save at the bottom of the form. You can also click on Preview, which will allow you to preview the entry you just made, and to make changes. Don't forget to click Save at the end, otherwise your data will not be saved.
Editing and adding public data
To edit or add data to this conscientious objector or peace activist, you need to click on the link Create related content on the top (underneath the name). A new menu will open:
This menu consists of the following options:
- co-alerts (office use only)
- CO declarations
- Detentions
- Private data (only when you have the right to access private data)
- Support email (office use only)
- Support group
- Related articles
Each of these menu items will lead to the appropriate form. Before that you can choose from two options:
- to create a new CO declaration, detention, etc.
- to add the present activist/CO to an existing declaration, detention, etc.
CO declarations
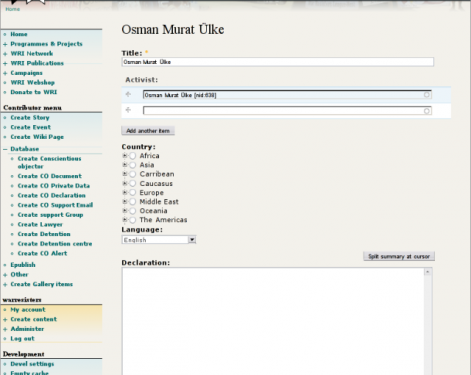
When you want to create a new CO declaration, the form that opens has on the top the title field, pre-filled with the name of the activist or conscientious objector. This can be replaced though, if the declaration has a title. If not, it is best to write "Declaration of " in front of the name of the conscientious objector.
The country will already be filled in with the country of the conscientious objector, and does not need changing.
It is important to make sure the language matches the one of the declaration. Choose the right language from the menu on top of the big text box. If you do not choose the right language, it will confuse the in-built translation tracking system of the WRI website.
For the alert itself, you can use some formatting marks, as you can when you add a story to the WRI website. The marks are mainly for lists, emphasis, or adding links. You can also add photos to the CO declaration using the same method as when you add a photo to a conscientious objector.
Another important part is to get the date right. Underneath the text box, there are several different options. When you click onto the + in front of Advanced Settings, you will be able to see and click on Authoring Information. Here you can enter a date. Make sure you do so in the form specified: YYYY-MM-DD (you can omit the time). If you create the CO declaration on the day is has been made, you do not need to do this.
Once you are done, click on Save again, or on Preview.
To add an activist or conscientious objector to an existing declaration (in case of a collective declaration), you choose the option Add to existing CO declaration after clicking on CO declaration under Create related content.
You get the form shown below:
To find the right declaration, just start to type the title of that declaration. All matching CO declarations will be shown, and you can just click on one of them to choose it. Then you need to click on Add and you're done.
Detention
Periods of detention can be added very much the same way as CO declarations. Here there is only the choice to add a new detention, as detentions are always linked to only one activist or conscientious objector.
The title of the detention is filled in automatically with the name of the activist/conscientious objector and should not be changed. Also, leave the field Activist alone - this is the link to the activist/conscientious objector, and if you touch this, you disconnect the detention from the activist.
The country is filled in automatically. So you need to fill in the following fields:
- detention centre
- start date
- end date
- a description
In the field detention centre you start typing the name of the detention centre or prison, and a list of options will appear. If you can't find the one you need, leave it blank for now and add it later.
The field start date will bring up a calendar, where you can pick the date. You can also just type the date in the format DD/MM/YYYY. The same applies to the end date. If you do not know the exact date, you still need to enter a full date. Enter an estimate. If the end of the detention is not known (in cases of pre-trial detention or unknown sentences), leave the end date blank.
The field Description should be a brief description of the detention: the sentence, how long, is it the first or second or x-th imprisonment, or any other relevant information. Keep it brief. Also, adjust the language (on top of the description text box) accordingly - this is a translateable field, so the description can be translated into other languages.
Once you are done, click on Save or Preview and then Save, to save the detention to the database.
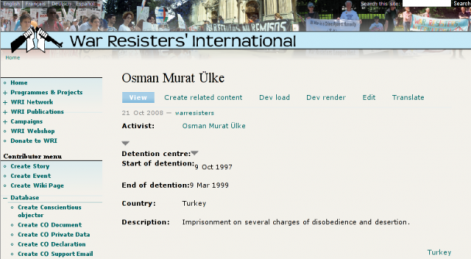
You will then get to the detention overview screen.
If you need to add or change the detention centre, you can click on the small arrow on the right of the "Detention centre:" listing. You can then choose between two options:
- Replace with new detention centre
- Replace with existing detention centre.
In the second case, you get a form where you again start typing into the field, and will be presented with a list of existing detention centres that match what you typed.
In the first case, you will get to the form for entering detention centres.
Creating a detention centre
Besides creating a new detention centre from the detention overview, you can also do so from the database menu on your left. The form you will get is the same.
In the title field, add the Detention centre name. This is how you will recognise your detention centre when you search for it. So make it obvious.
It is again important not to forget to choose the country.
For the phone and fax numbers please use the international format, and use + for the international access code, and not 00 - not in all countries you dial 00 before the international dial code (enter +44-20-7278 4040 for example for War Resisters' International).
Include a many address details as you can, and include the country in the address field too.
You again finish by clicking Save at the bottom of the page.
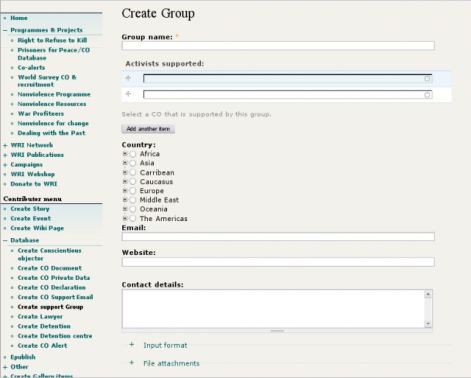
Creating a support group
You can create a support group from the database menu on your left, or from the activist/conscientious objector public data view (create related content -> support group).
Under Group name, write the name of the group in the original language, and with all special characters, as long as they are derived from Latin. You can add the name in another script in brackets behind the name in Latin script.
Leave the Activist fields alone - these are to link a support group to activists/conscientious objectors, and will be filled in automatically when you link a support group to these.
However, if you are creating this support group especially to link it to an activist/conscientious objector, you can start to type the name in the first empty Activist field. You will get a list of matching choices, and you can click on one to select it.
It is again important to not forget to choose the right country.
Email and website are self-explanatory.
Under Contact details, enter the direction, and any phone numbers, always in the international format. As a minimum, the area code is necessary - it can be a huge problem for someone else to find out the area code in another country, especially if the group is not based in a big city.
Once you're done, click on Save.
Adding a support group to a conscientious objector
To add a support group to an activist or conscientious objector, you start from the public data view with Create related content -> Support group. You can either choose Create new support group, if the group does not yet exist, or Add to existing support group. In the latter case, you will again get a small form titled "Add
Create related article
Any activist or conscientious objector can be linked to any number of articles. From the public data view, choose Create related content -> Related article, and you can again choose between creating a new story, or choosing one to link the activist to.
This works the same way as in all other cases: you start typing the title of the article you want to link to, and a list of matching options will appear. Click on the right one, and click on Add to finish.
An activist or conscientious objector can be linked to as many stories as you want to, and also any story can be linked to as many activists/conscientious objectors as you want to.
Editing and adding private data
The private data basically consists of:
- contact and other personal data of the activist/conscientious objector;
- relevant documents that you think should not be public, or only exist as scanned documents (public documents can be added as story and can then be related to the activist/conscientious objector);
- links to lawyer(s) representing the activist/conscientious objector.
